Master Your Data at a Glance: Q&A on Data Wrangler’s New Notebook Results Table
If you have ever felt frustrated rewriting the last line of a notebook cell just to get a quick overview of your data, you’re not alone. The default Pandas DataFrame output in VS Code is a static, truncated HTML table that often leaves you wondering about blank values, uniqueness, data types, or specific occurrences. Data Wrangler now replaces that static output with an interactive table, giving you immediate answers without extra code. This Q&A covers everything you need to know about the feature, from seamless integration to advanced insights.
Why do I need an interactive table for my Pandas DataFrame?
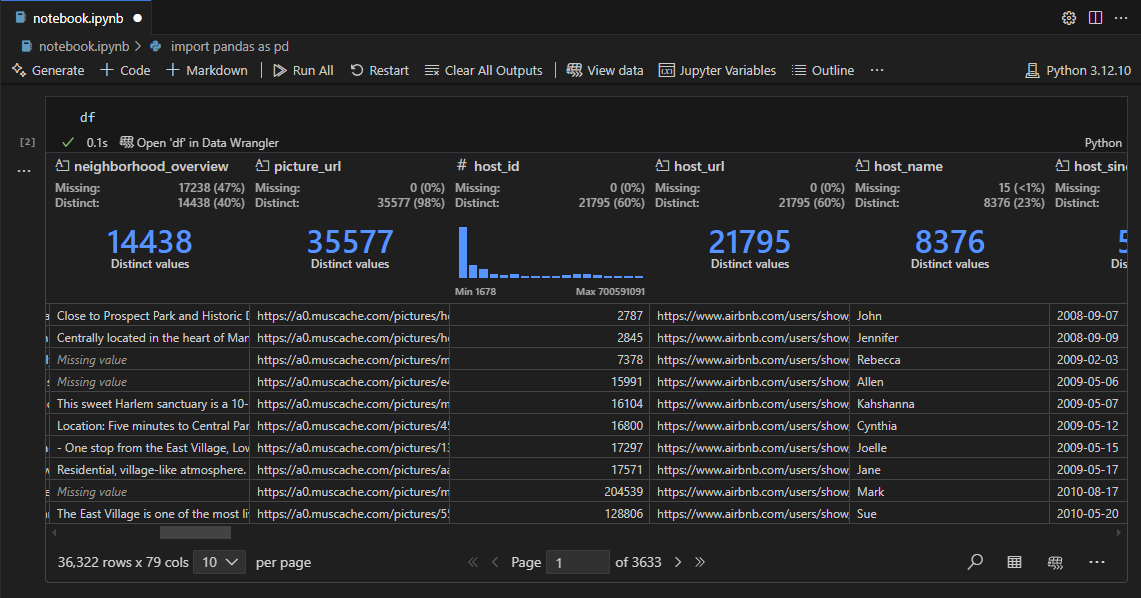
The default static table in VS Code cannot answer common questions like “Are there unexpected blank values?” or “Do my key columns contain only unique values?”. You used to write repetitive code just to peek at the data. With the new Data Wrangler notebook results table, you get instant answers with a single glance. The column headers automatically identify missing values and distinct counts. You can sort, filter, and explore without writing a single line. This saves time and reduces cognitive load, allowing you to focus on analysis instead of coding for exploration. Whether you’re checking data types or looking at the last rows of a 30k-item list, the interactive table makes your workflow faster and more intuitive.
How does Data Wrangler integrate with my existing notebooks?
Integration is seamless. The new experience automatically replaces the standard static HTML table output for Pandas DataFrames only where it makes sense, with no extra steps. After you install the Data Wrangler extension (free from the VS Code marketplace), simply run a notebook cell that contains a DataFrame. The output immediately becomes an interactive table. You don’t need to modify any code or add special wrappers. Even running a cell with just df is enough to trigger the enhanced view. If you ever need to return to the classic output, you can disable it in settings, but most users find the interactive version far more powerful. The feature respects your existing notebook workflow—no copying, no pasting, no context switching.
Can I sort and filter columns without writing code?
Absolutely. The new table includes intuitive column sorting and filtering controls. Click any column header to sort ascending or descending—great for quickly scanning high or low values. Use the filter dropdown to select specific rows based on text, numbers, or dates. There is no need to memorize Pandas syntax for df.sort_values() or df.query(). Everything you do in the UI is reflected instantly, and you can even reset filters with one click. This is especially helpful during early data exploration when you are unsure exactly what you are looking for. Combined with auto-detected missing or distinct values, sorting and filtering turn the table into a powerful data inspection tool—all without leaving your notebook cell.
How does the table help me spot missing or duplicate values?
Column headers in the Data Wrangler results table display valuable metadata at a glance. A missing-value indicator appears automatically if a column contains blanks (NaN). You also see the number of distinct (unique) values per column. This means you instantly know whether there are rogue blanks or unexpected duplicates, without writing a single line of code. For example, if you plan to use a column as a key, you can quickly verify uniqueness by looking at the distinct count. If you spot a discrepancy, you can then dive deeper using the built-in summaries or filtering. This feature eliminates the need to run df.isnull().sum() or df.nunique() repeatedly—the information is right there in your output.
What deep data insights can I access without leaving the cell?
You can open a detailed view for any column by clicking the “Show details” button in the header. This brings up summaries, statistics (min, max, mean, standard deviation, etc.), a histogram showing value distribution, and a frequency table for categorical data. All of this appears in a panel that overlays your notebook cell—no need to open a separate window. You can explore multiple columns in turn, comparing distributions side‑by‑side. For numerical columns, the histogram helps you spot outliers or skewness. For text columns, frequency counts reveal the most common entries. This level of insight used to require extra libraries or multiple cells; now it is a click away. Everything stays within the context of your analysis, keeping your flow uninterrupted.

How do I access the full Data Wrangler experience and Copilot-powered cleaning?
With one click on the “Open in Data Wrangler” button, you’ll jump from the notebook results table into the full Data Wrangler environment. There, you can perform advanced data cleaning operations like removing duplicates, splitting columns, or formatting data types—all with a graphical interface. Even better, the Copilot integration allows you to describe what you want (e.g., “remove rows with null values”) and have it generate the transformation code. You can preview changes before applying them. Going back to your notebook is equally simple: just click the “Back to notebook” button. The entire workflow remains connected, so any cleaning you do in Data Wrangler can generate code that you can reuse. This hybrid model combines the ease of a visual tool with the reproducibility of code.
What export options are available after cleaning my data?
Once you have explored and cleaned your data using the interactive table or the full Data Wrangler interface, you can export the result in two common formats: CSV and Parquet. CSV is ideal for sharing with spreadsheet applications or for feeding into other analysis tools. Parquet is a columnar storage format that compresses data well and is faster for large datasets—perfect for pipelines or machine learning workflows. Exporting is as simple as clicking the “Export” button and choosing your preferred format. The exported file preserves any transformations you applied, so you can continue your work elsewhere without redoing the cleaning. This flexibility ensures that your cleaned data is ready for the next stage, whether that is visualization, modeling, or reporting.
How do I start using Data Wrangler’s notebook results table today?
Getting started is easy and free. First, install the Data Wrangler extension from the VS Code marketplace (it works with the latest version of VS Code). Ensure you have a Python environment with Pandas installed. Open any Jupyter notebook inside VS Code, run a cell that outputs a Pandas DataFrame—for example, df or df.head()—and watch the static table transform into an interactive table with sorting, filtering, and metadata. No configuration needed. If you want even more features, click to open the full Data Wrangler experience. We are constantly improving the tool based on user feedback. If you encounter issues or have suggestions, please let us know on our GitHub repository. Start exploring your data more intuitively today.
Related Discussions